Wet vs Dry Packing Concrete for Fence Posts
Home Improvement, Fencing
Wet Packing vs Dry Packing Concrete for Fence Posts: What Really Works?
Setting fence posts correctly is the difference between a sturdy, long‑lasting fence and one that leans, wobbles, or fails after the first big storm. One of the biggest decisions you’ll face is whether to use wet‑packed or dry‑packed concrete around your posts. This guide breaks down both methods and helps you choose the right approach for your next fence project.
What Does It Mean to Wet Pack vs Dry Pack Concrete?
When you’re putting in fence posts, the concrete around the base can be installed in two main ways:
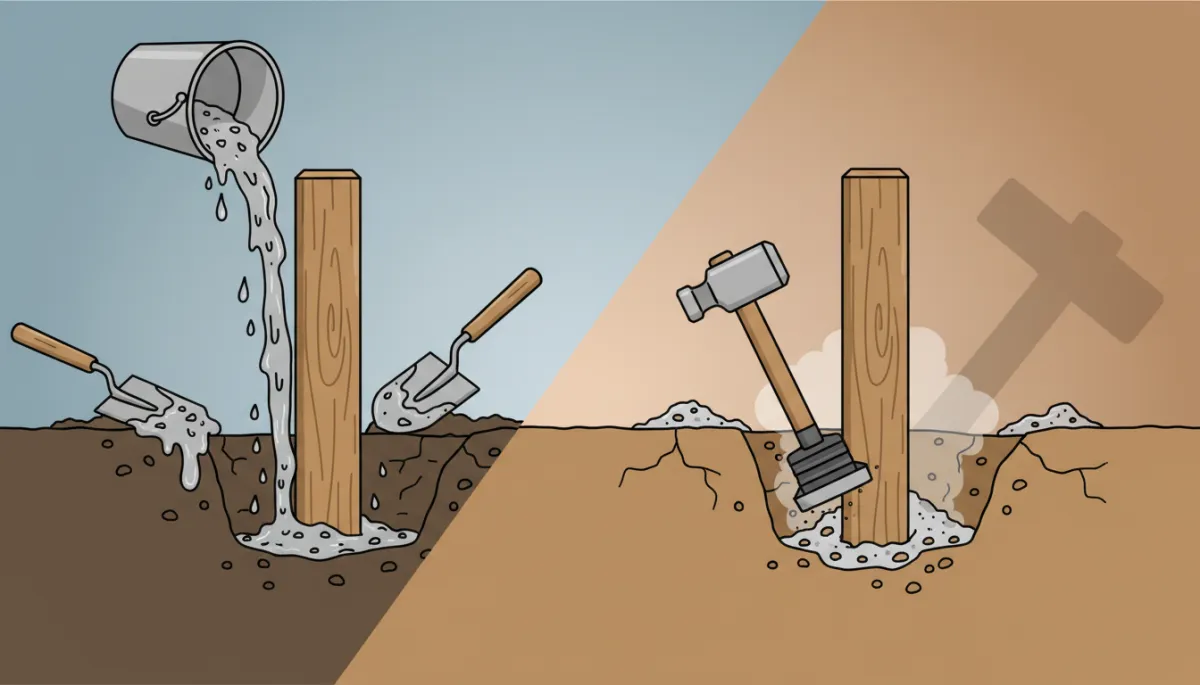
Wet packing concrete means mixing the concrete with water in a wheelbarrow, bucket, or mixer to a thick, pourable consistency before placing it in the post hole. It looks and behaves like traditional concrete you’d pour for a slab or footing.
Dry packing concrete (often called “dry set” or “no‑mix”) means pouring the dry concrete mix straight from the bag into the hole around the post, then adding water on top and letting moisture soak through and cure the mix in place.
Both methods can hold a fence post, but they behave differently during installation and over time. Understanding those differences helps you match the method to your soil, climate, and fence style.
Wet Packing Concrete: Strong, Consistent, and Reliable
With wet packing, you fully hydrate the concrete before it ever touches the post hole. This gives you a uniform mix and predictable curing. For most climates and soil types, it’s the more traditional, engineer‑friendly option.
Pros: Strong, consistent set; easier to consolidate and eliminate voids; better in very dry or very wet soils where moisture movement is unpredictable; ideal for gates and taller fences that carry more load.
Cons: More labor and tools (mixing tub, shovel, or mixer); heavier to handle; longer initial setup time; posts may require bracing while the concrete firms up.
💡 Pro Tip: When wet packing, slope the top of the concrete slightly away from the post so water sheds instead of pooling at the base, which helps reduce rot in timber posts.
Dry Packing Concrete: Faster, Simpler, but More Sensitive to Conditions
Dry packing is popular with DIYers because it’s quick and tidy. You position the post, pour in dry mix, add water, and allow the ground moisture and gravity to do the rest. Many “fast‑setting” fence post concretes are designed with this method in mind.
Pros: Minimal tools; less mess; faster to place; posts can often be plumbed and lightly used sooner, especially with fast‑set mixes.
Cons: Risk of uneven hydration and weak spots; relies heavily on soil moisture and good water distribution; not ideal for very dry, sandy, or highly draining soils unless you’re precise with water application.

Taking time to plumb each post now prevents a crooked fence later.
Step‑by‑Step: Setting Fence Posts with Either Method
1. Plan Your Post Depth and Hole Size
As a general rule, bury at least one‑third of the post length and dig holes about three times the post width. For a 6‑foot fence with 4x4 posts, that often means a 2‑foot‑deep hole, roughly 10–12 inches wide, depending on soil and wind exposure.
2. Prepare the Base of the Hole
Add a few inches of compacted gravel to the bottom of each hole. This helps with drainage and gives the post something solid to bear on, whether you choose wet or dry packing. Set the post on this base and check it roughly for plumb in both directions.
3. Using Wet‑Packed Concrete Around the Post
Mix concrete with water in a tub to a thick, workable consistency—similar to oatmeal that holds its shape when mounded.
Shovel or pour the mix into the hole around the post in layers, tamping gently with a stick or rod to remove air pockets as you go.
Check the post with a level from two sides, adjust as needed, and brace it if the fence line or wind might push it out of plumb before the concrete sets.
4. Using Dry‑Packed Concrete Around the Post
Position the post in the hole and support it loosely so it stands upright.
Pour dry concrete mix evenly around the post, typically filling to a few inches below grade, and lightly rod the mix so it settles without leaving large voids.
Add water slowly, following the bag instructions, allowing it to soak in rather than run off. Re‑check the post for plumb as the mix begins to firm up, making small corrections early.
Which Method Should You Choose for Your Fence?
If you’re installing a standard backyard fence in average soil, either wet or dry packing can work when done carefully. For gate posts, corner posts, taller fences, or exposed windy sites, wet packing usually offers more peace of mind and long‑term stability. Dry packing shines when speed and simplicity matter, and soil conditions allow moisture to move evenly through the mix.
Whichever method you choose, the essentials remain the same: dig properly sized holes, provide drainage, use quality concrete, and take your time plumbing each post. Get those details right, and your fence will stay straight and solid for years to come.
